Are you needing an ancient spell book to go along with you Witchy accessories?
Well worry no more!
Super Simple way to make an spellbook!
You will need:
a hard cover book:
You can find some at goodwill or even at the dollar store
(please, please, please, make sure you are not defacing an important or first edition book!!)
Paper towels
watered down mod podge or watered down school glue
paint brush
paint
scrap cardboard
Start out by picking your book you will be working with.
I bought mine from the dollar store.
( ignore the box cutter...
this pic is from another upcoming project.
i used the same kind of book on this one..lol)
If your book has a dust cover, you will need to remove it
now you will have a nice plain hardback book
Start by picking out your design
I chose the Celtic tree of life
Draw your image onto your book
i started by drawing it on paper,
then i taped the paper onto the book and retraced it,
pressing down hard to transfer the image
I went over the transferred image with pencil

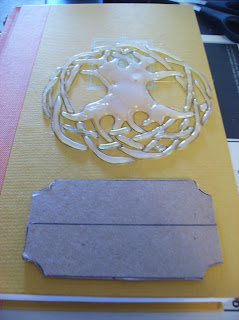
To make my image seem a bit embossed
i went over my image with hot glue

allow the glue to dry completely
note: if you want your image to be really defined
i suggest adding onto your glue lines, making them very pronounced
Next you will need to make your name plate and 'spines'
make sure your cardboard is thick enough to be pronounced off you cover
you don't need to cut it perfectly,
it adds to the aged look of the book
it adds to the aged look of the book
glue it to your cover
Next draw out your pieces of your spine
cut them out
glue them to your spine
( i had to trim mine a bit)


Next prepare your glue
either water down your mod podge a bit, or water down school glue
place a paper towel over the cover of your book
starting in the middle,
dab your glue/ podge on with a paint brush
work your way outwards,
pressing the towel in and around your design


Do this to the whole cover
while your paper is still wet
paint it with your base color.
I watered my paint down a bit
so it will spread and blend better


(below pic is bad at showing the brown color..)
allow to dry
Once your cover is dry open the book
and fold in your edges,
using the same watered down glue to glue it down
fold the edges like you would on a present

allow to dry
Next, move to working on the spine
fold over the paper towel and
using you glue mixture, glue it down
add another edge of paper towel and glue it to your spine
you can work on the backside as well as the spine
using the same glue technique as the front
Paint with your base color while still wet and allow to completely dry
I have a lack of pictures concerning the next few steps
( my camera battery died)
1. i first painted my tree and spines with a watered down dark green and allowed to dry
2. i painted over the whole book cover with a watered down grey/black mixture
then lightly wiped it off with a paper towel
3. I painted the whole cover with a watered down black and wiped off with a paper towel.
allow the whole thing to dry
allow the whole thing to dry
I still need to age my pages
i am planning on gold leafing the outer edges of my pages
( i couldn't find my gold paint)
and i still need to name my book
and maybe add a bit more design...
here is the current final product though


Any witch or wiccan would be proud to have this as part of their collection!!
I found the paper towel tutorial here
and the embossing idea here
The Prop and Armor Blog
Happy Halloween!


1 comment:
That is awesome. I actually have a bunch of old books that are not really in good condition that I have been thinking about using as craft supplies. Now I know what to do with them.
Post a Comment