Pages

Monday, March 29, 2010

Egg-tastic!!

I recently saw this image while skimming over martha stewarts craft page and i thought itd be neat to try and make the egg candles as easter decorations...
This morning while making breakfast i cracked open the tops of my eggs and saved the shell...

after cleaning out the shell i opened the top a bit more( very carefully) and placed a wick in the shell ( i already had the wicks)

I used some candles i already had.. you can light them and use the melted wax.. another way is to place the calndle in a small saucepot witha bit of water in it and heat it up until the wax is melted...

carefully pour the wax into the egg shell.. use a funnel if necessary..

prop up the wicks if necessary and allow the wax to cool..

once cool, display however you choose!!

you can even light them! the look awesome lit up! you can even see the crackle in the shell....!!!

Im planning on dying the shells when the family dyes eggs for easter... looking forward to seing them in different colors.. Happy easter!!!

Saturday, March 27, 2010

new artwork..

ive been trying to liven up my daughters room. her theme is to be bollywood/indian themed....ive been wanting to make some artwork for her walls.. here was my first attempt.. i cant quite decide if i like it.. might retry for a cleaner look or on different fabric..
i had some really plain frames that i decided to work with...
i painted them blue/green and purple...(i forgot to get pics..lol)
working with the smaller frame i took the cardboard back and covered it with black fabric..
I made a "stencil" with paper of the picture i wanted ( i suggest freezer paper or something more substantial than regular paper..
Frugal tip!!- egg crates work fantastic to hold paint!
i used pink paint and a painting sponge to cover the stencil...
after letting it dry a it i peeled off the stencil and reframed the pic.... i still cant quite decide if i like it... im thinking making it cleaner and maybe more lively fabric will make it look better... btu it was a fun first attempt!!

crib skirt trim tutorial update

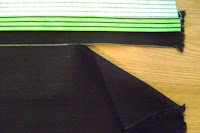
I thought id make a better 'tutorial' ( or atleast to the best of my ability to explain..lmao) on how i cheated at making the trim on my dust ruffle. after measuring out the fabric i made a small seam.. then decided how thick i wanted my trim. it was easy to get it straight with this fabric beacause of the lines. my trim was an inch wide.
after determining where the line was i added the lightweight bond strip( you can use heavy if you want.... im sewing over mine so didnt need heavyweight bonding)
i made sure it was even along the line i wanted
i then laid the black fabric upside down against the bonding and ironed it...
i then flipped the fabric over and ironed down the crease... i now have a straight border!!!
i flipped everything over to the back of my project.. then trimmed my fabric
i then placed on more bonding tape..and started folding over and ironing ..
voila!! a straight and nice and even trim!!!!

Thursday, March 25, 2010

Apologies!!

ive skimmed through my blog and realized my many spelling errors..lol.... sorry about them...

Crib update!!

It has been raining and thundering all day today!!

Ive stayed inside and have been working on the babys bedding..
Ive got one whole side of the crib dust ruffle/skirt complete.
i decided to do a box pleat dust ruffle...I dont have pictures for every step but ill do the best i can...i started off by measuring the length and height of the side i wanted to sew it for...( 52 inches long, 18 inches long) . i then measured the fabric out leaving one extra inch or so for the top and bottom seams and then measured out the length ( added 10 inces or so for the pleat and hems..) i used lightweight iron on binding to make the seams then sewed over afterwards..
bottom seam after bonding...before sewing
after making the upper and lower seams i measured 52 1/2 inches from each end and created my pleats and ironed them down creating the creases.
This is where i wish id done a fewn things a bit differently.. and will next time...
the next step was to add the lower trim.. id originally started on the backside and turned it... next time i will start in the front with the lightweight bod tape ( helps me get my seams straight) the turn to backside...anyways i got the trim on and then it was time to add the inner black.
i just used the lightweight bonding tape on each side of the creases and edges of the fold and ironed down the piece of fabric.. then folded in the sides to create the hem...
i re-ironed to reset the creases.. i should have sewn the black down at this time.. would have made it much easier.
i sewed the seam on the top, pinning down the upper creases to set the pleat.. i also seamed the lower hem ( leaving the bottom crease open) and sewed the black in... which ill admit was a bit difficult.. then after measuring the length and hemming the outer sides it is complete!!
now to attach it!! i have currently pinned on ties and am considering making them permanent or maybe using velcro on the back of the dust ruffle and the outter side of the mattress frame.. but im proud of how its turned out..
Finished Product!!!
im sorry about the bad 'tutorial' if thats what you even want to call it.. but i created this from scrath ( no pattern) and im very pleased with the finished product. i still need to make one more of these for the other side, and also the end pieces... looking forward to the crib bedding being complete!!

Wednesday, March 24, 2010

Progress update!!!

The Crib is finally complete!!!! Im so excited to have it done and put together!! It took a while to get done because the weather kept changing on me ( cold, windy etc) but it is finally complete and it looks great!!!

The colors are Lime green, white and black.. they look amazing with the black crib.. now all thats left is to make the crib set.... sheet, duster, blanket and bumpers.... the sheet will be the hardest... i know ill get it done before he ever sleeps in the crib though. ill be breastfeeding and cosleeping and/or bassinet so itll be a few months before he actually sleeps in his crib in another room. itll give me a bit of a chance.. im just worried about running out of the polka dot fabric because i bought all they had!! lol... if anyone has any insight on making crib bedding id really appreciate any creative imput!! And again...YAY!!!!!
Related Posts with Thumbnails